Salty Honey Pie

For any non-Americans, here’s a little lesson on Thanksgiving dessert:
1. Thanksgiving dessert = Pie.
2. Pie = Apple, Pecan, or Pumpkin.
3. Apple, Pecan, or Pumpkin = the Thanksgiving Pie Trinity.
In other words: a good, classic Thanksgiving will have all three pies at the table. Pecan Pie, in all its saccharine splendor, is for those with a major sweet tooth; Apple Pie is for the traditionalists, and super seasonal to boot; spicy Pumpkin Pie is usually only eaten once a year, at Thanksgiving, and is cherished all the more for it.
I’m a fan of all three, and I’m all for tradition. But this year, I had only one pie on my mind, a pie that has stayed with me since a visit to Four & Twenty Blackbirds Bakery in NYC earlier this year. A little background: Four & Twenty is a small (just a few tables!) but mighty operation, boasting a vast selection of everything from Chocolate Chess to Matcha Custard to Salted Caramel Apple pies, among many others. I was familiar with the bakery already — having followed them on Instagram for years, and having heavily stalked them while planning my NYC dining adventures — and made a stop there early on in my stay. I sampled a variety of pies, all delicious, but there was one that truly impressed me, one that I absolutely knew I’d have to make at home, as waiting for another visit to NYC would be too long of a wait: ladies and gentlemen, Salty Honey Pie.
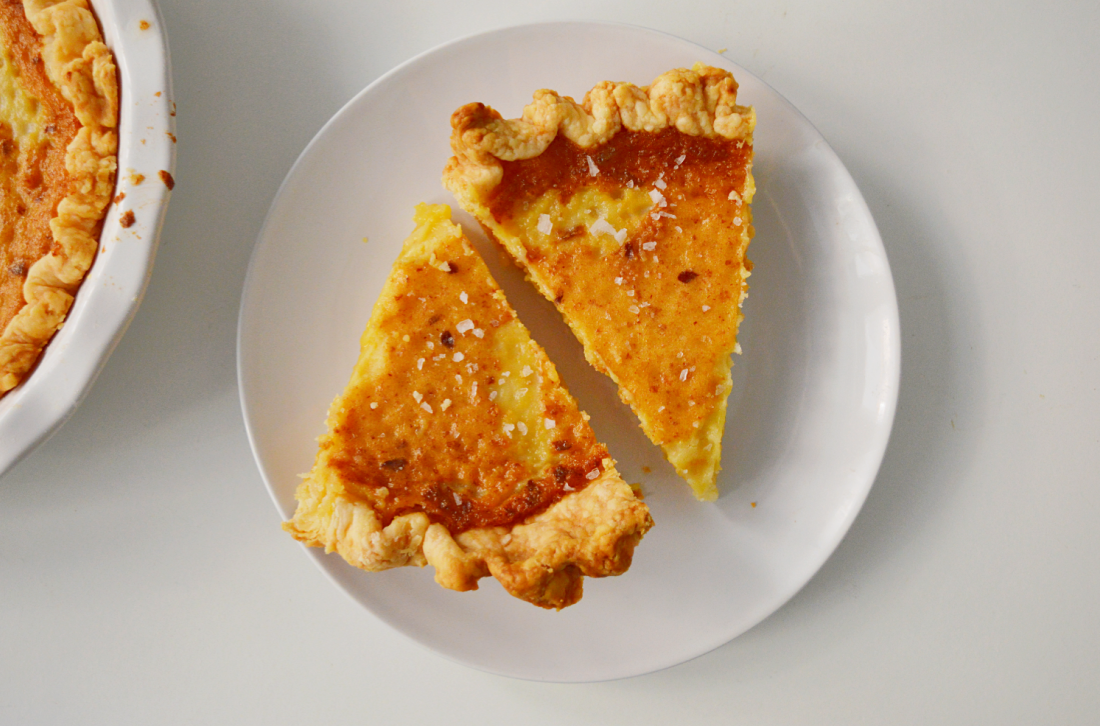
Four & Twenty’s Salty Honey Pie wasn’t a fruit pie, or a cream pie, or an ice cream pie — it was unlike any pie I had ever tasted, in the best of ways. As the name suggests, this confection is a glorious mix of salty and sweet — god bless the genius who decided to pair a sprinkle of salt with desserts — with a gooey, buttery, and borderline caramel-y custard, bolstered by a good dose of cozy, hug-after-a-long-day honey. A hefty pinch of salt and a little vinegar (sounds weird, but it works) keep the sweetness in check. It’s easy on the eyes, too, sporting a lovely warm golden color and a glittery, sparkly sheen thanks to the aforementioned flaky salt. Moreish deliciousness aside, I also found it to be a pretty forgiving pie. In all my haste and excitement to have my next slice of Salty Honey, I forgot to strain the custard, and it was still great. A little aluminum foil (used to keep the edges of the pastry from browning too much) took some of the custard off the top, and it was still pretty (albeit a little rustic). Freezing the pie crust also meant that the crimping along the edges held their shape, something I’d never been able to properly manage.
Moral of the story: I love, love, love this pie, and think it most certainly deserves to shake up your usual Pie Trinity (thoughts on a Pie Square?). And if you’re not celebrating Thanksgiving? No problem. Since when do you need a special occasion to bake a pie?!
A couple of notes: I chose to make the pie crust from Four & Twenty Blackbirds, but feel free to use your own recipe or even store-bought, if you prefer. If you are making the crust from Four & Twenty, note that it calls for quite a bit of liquid; I only ended up using about 5-6 tablespoons out of the 10 tablespoons of liquid it calls for. I also used cold water instead of ice water, as I didn’t have any ice on hand, and it worked out fine - do as you wish. Now: as delicious as this pie was, and as much as I liked the flavor/texture of the crust, I found that the bottom of the crust didn’t cook as much as I’d like. I’m not sure if this is because the pie crust was frozen, and not blind-baked, or if it’s the sameproblem with my oven I've been having. In any case, if I were to make this pie again, I would blind-bake the crust — for those of you unfamiliar with the process, I like this tutorial here. If you have a more reliable oven, then you’re probably fine to just freeze the pie crust and bake it (I trust that Four & Twenty know what they’re doing.) Finally, the dough is good refrigerated for 3 days or frozen for 1 month if wrapped tightly.
Looking for other pie recipes? Click here.
Looking for other Thanksgiving recipes? Click here.
For other sea-salt kissed desserts, I have this Chocolate Olive Oil Cake and these Chocolate Chunk Cookies and this Skillet Cookie.
SALTY HONEY PIE
Serves 8-10. Recipe from Four & Twenty Blackbirds Bakery, NYC.
Ingredients for the crust:
1 1/4 cups (150 grams) unbleached all-purpose flour
1/2 teaspoon (a little less than 3 grams) salt
1 1/2 teaspoons (6 grams) sugar
1 stick (1/4 pound, 112 grams) cold unsalted butter, cut into 1/2-inch pieces
1/2 cup (120mL) cold water
2 tablespoons (30mL) white vinegar
1/2 cup ice
Ingredients for the filling:
8 tablespoons (112 grams) unsalted butter, melted
3/4 cup (150 grams) sugar
1 tablespoon cornmeal
1/2 teaspoon salt
2 teaspoons vanilla extract
3/4 cup (255 grams) honey
3 large eggs
1/2 cup (120mL) heavy cream
2 teaspoons white vinegar
1 to 2 teaspoons flaky sea salt, for finishing
Directions for the crust:
1.) Stir the flour, salt, and sugar together in a large bowl. Add the butter pieces and coat with the flour mixture. With a pastry blender or using your fingers, cut the butter into the flour mixture, working quickly, until mostly pea-size pieces of butter remain (a few larger pieces are okay; becareful not to overblend).
2.) Combine the water, cider vinegar, and ice in a small bowl. Sprinkle 2 tablespoons of the ice water mixture over the flour mixture, and mix and cut it in with a pastry blender or your fingers until it is fully incorporated. Add more of the ice water mixture, 1 to 2 tablespoons at a time, mixing until the dough comes together in a ball, with some dry bits remaining. Squeeze and pinch with your fingertips to bring all the dough together, sprinkling dry bits with more small drops of the ice water mixture, if necessary, to combine. Shape the dough into a flat disc, wrap in plastic, and refrigerate for at least 1 hour, but preferably overnight.
3.) Remove the dough from the fridge 5-10 minutes before you begin rolling. Lightly flour your work surface and rolling pin. Place the dough in the center of the work surface, and beginning from slightly below the center of the disc, roll the dough away from you, using one even stroke. After each stroke, spin the disc a quarter turn counterclockwise and roll again. Sprinkle more flour underneath and on top of the dough and on the rolling pin as you work; use just enough to prevent the dough from sticking. The circle of dough should end up being 2 - 3 inches larger than the pan you are using, and about 1/8 inch in thickness.
4.) Transfer your dough to a well-buttered pie pan (I use my rolling pin to help with this). Make sure there are no gaps between the dough and the pan. Trim the dough overhang to allow 1 to 1 1/2 inches of excess, measuring from the inner rim of the pan. If you’d like to crimp the edges of the pie crust, this is a useful tutorial here that has lots of good ideas!
5. Transfer the pie crust to freezer. Crust must be frozen before filling and baking (I froze mine for about 3 hours, but see my comments in the Notes above).
Directions for the filling:
1.) Position a rack in the center of the oven and preheat the oven to 375 F (190 C). In a large bowl, whisk together the melted butter, sugar, cornmeal, salt, and vanilla extract. Whisk in the honey and the eggs one at a time, followed by the heavy cream and vinegar.
2.) Strain the filling through a fine-mesh sieve directly into the frozen pie shell, or strain it into a separate bowl and then pour it into the shell. Bake on the middle rack of the oven for 45 to 50 minutes, rotating 180 degrees when the edges start to set, 30 to 35 minutes through baking.
3.) The pie is finished when the edges are set and puffed up high and the center is no longer liquid but looks set like gelatin and is golden grown on the top. Allow to cool completely on a wire rack, 2 to 3 hours. Sprinkle with flake sea salt. Serve slightly warm or at room temperature. The pie will keep refrigerated for 4 days.