Pasta series #6: Gnocchi di zucca

After a two month long break – a first in these 5 years of Pancakes & Biscotti history – the blog and I are back and feeling refreshed! The recent hiatus has been decidedly useful; it’s given me time to recharge my blogging batteries and figure out what my next steps in 2020. Most importantly of all, I've had the time needed to rework the look of the blog -- that's right, expect a blog makeover soon -- something I'd been meaning to do for ages and that has now been more or less crossed off one of my many beloved “TO DO” lists. Stay tuned for the blog’s new look shortly, and a big thanks to Giacomo for all his help!
In the meantime – a new recipe! As per relatively new tradition, the first post of every month recounts my latest adventures in pasta-making -- what better way to start off a new month than with a bowl of pasta?! --
and so here is episode #6 in the P&B pasta series, Gnocchi di zucca, aka pumpkin (or squash) gnocchi. Fun fact: in Italian the word zucca is used for both pumpkin and squash, and for the record, I used squash.
Gnocchi are pasta, yes, but quite different than the pasta I’ve grown accustomed to make so far this year; after months of lecturing you on kneading techniques, different types of flour, and the difference between egg pasta and semolina flour/water pasta, gnocchi are here to give you all a break and switch up my repertoire a little. They aren’t so much more complicated than making cavatelli, orecchiette, or malloreddus, but they can be a bit finicky. Below the main points acquired in my Gnocchi Education while coming up with this recipe:
1.) Rule #1 when making gnocchi: the more flour you add, the heavier your gnocchi, so try and use as little flour as possible! You might notice there is no egg used in this recipe, when many gnocchi recipes call for one. I made these twice, once with egg, and, per the advice of Carla Tomasi, without egg. The idea of course here is that the more moisture you add to the dough, the more flour you need to add; the gnocchi made without the egg were much lighter, not to mention a lot less messy on my board. The addition of potato flakes -- a tip I picked up from my beloved Giallo Zafferano -- was also great. Win win!
2.) I used delicata squash here, as the flesh has little water -- what we want when making gnocchi, because again, the more flour we add, the heavier our gnocchi! -- but butternut squash should work here too. I used red skinned potatoes, as they have a low-water content, too.
3.) Try and work together the potatoes and squash while they’re still warm; both veggies are starchier at this stage, and the starch will bring the dough together without adding too much flour. Work your dough quickly and don’t over knead it, which could (also) lead to heavy gnocchi.
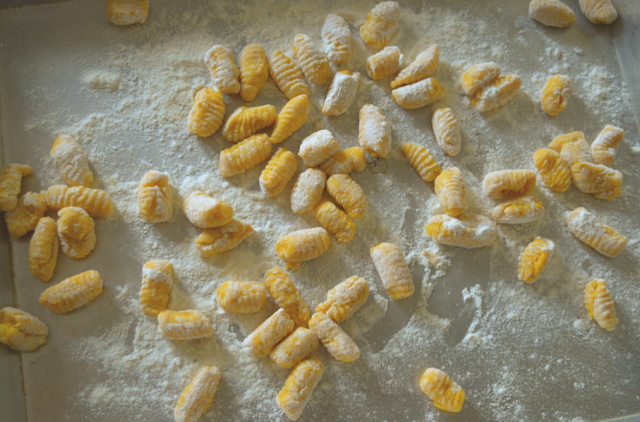
4.) I tried to form my gnocchi the traditional and also slightly fancier way, using the gnocchi board, but found that simply cutting my gnocchi with the bench scraper -- or rather, leaving them at the step before rolling -- was faster and made gnocchi that were just as nice. In these photos you'll see my first test of the recipe, where I rolled my gnocchi with the board (a bit uneven, I must admit) so feel free to disregard if you, like me, don't want to bother with this step.
The verdict, then, after all this?
These gnocchi are feather-light – if they’d floated off my fork, I wouldn’t have been the least bit surprised -- just barely sweet and tinged with nutmeg, blissful when paired with melted butter (what isn’t!) and the herb equivalent of a-hug-on-a-bad-day sage. With a shower of Parmesan and a sprinkle of toasted walnuts for a little crunch, there are few things more satisfying. BONUS: this pasta is arguably Thanksgiving-appropriate.
Thanksgiving may not be celebrated in Italy, but if you, like me, tend to do something every year anyways, these gnocchi are the perfect Thanksgiving-in-Rome sort of dish, a little nod to my adopted country of Italy and still not so out of place next to the usual stuffing and Turkey. Win win!
A couple of notes: In addition to my notes in the post above -- gnocchi should ideally be eaten as soon as they're cooked, but if there are any leftover, can be kept in the fridge for up to one day. These gnocchi can also be frozen; spread them out on a cookie sheet, dusted lightly with flour, and put in the freezer. Once frozen, place in a freezer bag and keep them handy for whenever you'd like. Highly recommended.
Want to know what the other recipes in my blog’s Pasta Series? Click here!
GNOCCHI DI ZUCCA.
Serves 4.
Ingredients:
1 pound (500 grams) Delicata squash
12 ounces (350 grams, to be more precise) red-skinned potatoes, scrubbed clean
1 1/4 cups (150 grams, to be more precise) 00 flour
2 tablespoons potato flakes
3/4 teaspoon (3 grams) salt
Pepper
Freshly grated nutmeg
Butter, sage, Parmesan, and walnuts for serving
Directions:
1.) Preheat the oven to 400 degrees Fahrenheit (200 degrees celsius) and then get to preparing your potatoes. Bring a pot of water (salted) to a boil and cook your potatoes for 30-40 minutes, roughly -- this will vary based on the size of the potatoes, but they should be ready when they are easily pierced with a fork but not so soft that they are falling apart (remember: the less water they absorb, the better!) . Note that if you prefer, you can also cook the potatoes in the oven.
2.) While the potatoes cook, prepare your squash. Cut the squash in half and clean out the seeds and stringy inside; cut in to slices and remove the skin on the outside too. Using a kitchen scale, measure out 350 grams (12 ounces) of squash. Line a baking sheet with kitchen paper, and bake the slices of squash in your preheated oven for 20-25 minutes, or until softened and slightly dried out -- the squash should be losing excess water here, which is what we want!
Once cooked, remove from the oven and leave to cool slightly.

3.) At this point, the potatoes will be cooked. Drain them and set them aside to cook slightly. Next sift, your flour on to a clean work surface (I used my pasta board) and create the classic "volcano" shape. Next, once the potatoes are cool enough, peel them and mash them with salt, pepper, and a bit of nutmeg.
Next, mash the pumpkin (or pass through a potato ricer). Place the potato and pumpkin into the "well" part of the volcano, and working quickly with a bench scraper to help you, incorporate them in to the flour, mixing them and cutting them in as you go.

4.) Once your ingredients are well mixed, give them a knead or two to bring everything together -- the minimum amount of work possible here! -- and sprinkle over the potato flakes. Work everything together briefly to incorporate them, then bring your gnocchi dough together and give it a round shape. Cover it with a kitchen towel and let the dough rest for about 10 minutes.
5.) Once the 10 minutes are up, sprinkle your work surface lightly with flour. Cut a piece of dough -- keeping the rest of the dough covered -- and roll it out into a rope. Using your bench scraper, cut the rope into uniform pieces to form your gnocchi, placing them on a floured baking sheet as you go. Feel free to also use a gnocchi board here, if you'd like (see "notes").
6.) Cook the gnocchi in boiling salted water, until you see them start to float to the top -- that's when they're done! Drain them and serve immediately tossed with melted butter and sage, plus sprinkle of Parmesan cheese, and a handful of chopped walnuts, if you're feeling fancy.