
Pasta Series #1: Ravioli fatti in casa
We're four months in to 2019 and my cooking and baking has never been so, well, interesting. I've been learning a few new tricks this year, taking a few steps outside my usual culinary comfort zone and shaking up my usual recipe rotation, and I've been having such a good time doing it (we've established I'm a food nerd already, yes?) I've started to learn to make everything from my own cheese to my own chocolates to my own cannoli (more on that soon) with plans to attempt homemade butter and jam, experiment with baking sourdough, and conquer the enigmatically flaky croissant, among other things. I'm not so sure what this surge of inspiration is due to -- turning 30? a great little kitchen in my new apartment? the fact that blog is soon turning 5?! the influence of Carla Tomasi?! -- but whatever it is, I'm not complaining.
So! There's lots and lots of pasta on Pancakes & Biscotti -- it truly is my favorite food group -- but if you look closely, you'll see that before today, I had never posted a recipe fresh pasta. This, for a couple of reasons: I live in Rome, where fresh pasta can be easily bought; the machine required to roll out the pasta was, I previously imagined, rather expensive; and besides, would anyone really be interested in reading about making fresh pasta on this blog, or would it seem too complicated and scare them off? In short, dried pasta was convenient and delicious and familiar; fresh pasta,was a once-in-a-while sort of food, one that I loved but had simply never really considered incorporating in to my repertoire. I carried on with my dried bucatini and rigatoni and fettuccine without a second thought.
But then I became friends with the all-knowing Carla Tomasi ("a national treasure!" an Instagram follower called her, and I'm apt to agree) who made making fresh pasta -- more specifically, fresh ravioli! -- seem like a breeze during a class at Latteria Studio not so long ago. With Carla's guidance, the once mysterious fresh pasta turned out to be pretty straightforward and completely doable, if you just kept in mind a few things:
1. Use good flour and the freshest eggs you can find;
2. Use a kitchen scale to measure the weight of the eggs -- multiply that weight by 2 and that's how much flour you should put in (perfect pasta every time!);
3. A good pasta machine isn't prohibitively expensive, costing between 30-50 euros, and lasts a life time. Good brands are Atlas and Imperial;
4. Making pasta is both easy and fast (who knew!) In fact, once you learn to make fresh pasta, the time elapsed between making a simple pasta (like tagliatelle, for example) and getting it on the plate is just half an hour, with time to make a quick sauce too (!!!)
Inspired, I got to work -- I ordered my pasta machine (Amazon, for the record) picked up the Carla recommended- flour, and on a lazy weekend in March, made my first batch of ravioli, rolling and cutting my pasta in the living room while watching Friends on Netflix (bliss!)
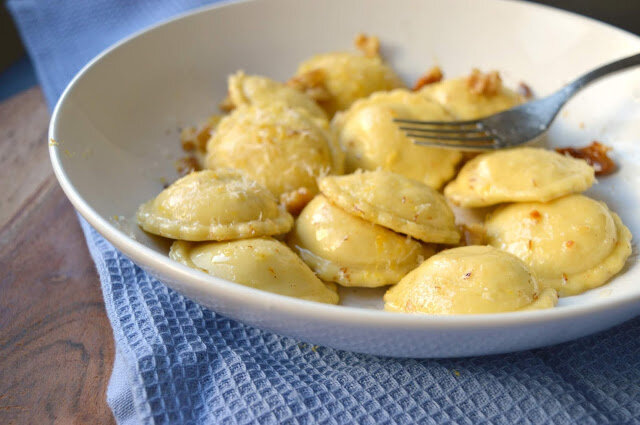
And the verdict, you may ask?! These ravioli were delicious, perfect, and bonus points, none of them opened up in the water while cooking as I had feared (phew!) They were ravioli that made my nonna clap her hands in excitement via FaceTime, and would have made my nonno very proud, especially because they were made with three kinds of cheese -- ricotta and gorgonzola in the filling, served with Parmesan on top -- and the lemon-y walnut butter they were served in didn't hurt, either. The whole dish was a joy to eat, and my only regret is not having attempted making my own pasta sooner.
What's up next, when it comes to pasta making, you may ask?! That would be hand-rolled pasta -- yes, pasta dough rolled out to uniform thickness with nothing but a rolling pin, cut by hand, pasta machines need not apply, as part of the tradition in Emilia Romagna -- because I think that would be pretty cool.
In fact, I love the idea of making my own pasta so much that I've decided to start doing a "Pasta Series" on this blog, where I make a new pasta every month, or as often as possible, to then share with you, and I've already got lots of ideas (cannelloni! orecchiette! malloreddus!) etc etc.
(You did read the part above where I admit to being a food nerd, yes? OK.)
A couple of notes from Carla: The taste and texture of fresh homemade pasta is an unsurpassed joy for the palate and the marvel of what two simple ingredients can produce.
After a little know- how is acquired the time lapse from thinking about and eating it could be just half an hour, with enough time the make a quick sauce too. My little piece of advice is this: never ever store your pasta machine at the bottom of a stack of boxes at the back of the store room ( you will never want or be able to retrieve it!) Keep your pasta machine in a handy place.The most important items besides flour are fresh eggs, free range and organic if at all possible. Even if the quality of your flour is not excellent the use of fresh eggs would balance things out. Once you have rolled out your pasta, please keep pasta away from sunlight, too much breeze or heat. It will dry out too fast with the risk of crumbling once it is being cut. Pasta is then ready for cutting when it is still pliable but fairly dry to the touch. If unsure do a little test with a piece of dough and if once cut the strands stick to each other wait a little longer. On hot/humid/rainy day pasta making could be a challenge. On very hot days is advisable to work fast and on humid and rainy it takes a long time to dry. If you have made too much pasta it can be stored away for other meals. It can be fully dried and kept in tight sealed boxes up to three months. However, if a cool spot for storing is not available it may be stored under refrigeration up to 5 days or kept in the freezer for a long time. Concerning your pasta machine: do not wash with water and soap or a strong detergent. Use a brush to remove excess flour and just wipe with a damp cloth. Buff it up with a dry tea towel. Leave out on the worktop for a day and then turn the rollers few times and shake upside down to dislodge any piece of dough.
A couple of my notes: This recipe makes quite a few ravioli, they freeze beautifully and are thus on hand whenever you need them/don't have time to make dinner/when a pasta craving strikes. To cut the ravioli, you can either use a stamp, or a cutter; I found the stamp to be easier, but if you want to use the cutter, you will have to cut the ravioli strip first on the two short ends, using very decisive strokes away from you, to cut the pasta cleanly; then on the long ends, and then finally in between the ravioli to separate them. Finally, per the advice of Carla, I used Molino Spadoni 00 flour, which worked wonderfully.
RAVIOLI FATTI IN CASA
For me this made about 40 ravioli, though this varies depending on how big you want to cut them/how large you cut the ravioli.
Ingredients for the pasta:
4 medium eggs, the freshest you can find
00 Flour, about 400 grams or a little less than 4 cups (but calculate the weight of the flour based on the weight of the eggs; see above)!
Ingredients for the filling:
1/2 cup (125 grams) ricotta
1/2 cup (123 grams) gorgonzola
2 ounces (56 grams) walnuts
2 tablespoons of freshly grated Parmesan cheese
A little milk, if needed
Salt, pepper
To serve:
Butter (eyeball it)
A big handful of chopped walnuts
A generous grating of lemon zest
Directions:
1. Start with your dough! Break the four eggs into a bowl and weigh them on a kitchen scale. In my case, the eggs weighed 220 gram (20 grams of which was the container I was measuring them in). Beat your eggs together and set aside. Next, Measure out double the amount of flour (in my case, 200 x 2=400 grams of flour) and place it in a large bowl. Make a well in the flour and pour in the eggs.
Gradually, with the aid of a fork, work the eggs into the flour until you get a shaggy mass. If the dough is a little dry add a little cold water.
2. Upturn the contents of the bowl onto a worktop (wooden preferably or maybe a large chopping board) and start to knead it. The pasta machine will do most of the work later so you only should knead the dough until it comes together. Unless your hands are very cold, body heat should work its magic on the eggs and turn the dough silky smooth. For a short explanation on how to knead the dough via Carla, click right here!


3. Next, leave the dough under an upturned mixing bowl to rest for at least 15 minutes.
Note that at this stage, the dough may be refrigerated until the next day and slowly brought back at room temperature prior to use.
Once the dough has rested, you can start to roll it out in to sheets (hurray!) Set up your pasta machine, attaching the roller handle and securing it to a work table.Set the rollers to the widest setting (0 in my case). Divide up the dough in to four or so equal pieces. You will work with one piece at a time.
4. Flatten the piece of dough out so that it will go easily through the pasta machine. Roll the dough through, fold the strip of dough like and envelope and roll it again. If the dough feels too sticky, dust it with a little flour. NOTE: never ever put any flour directly onto the rollers!!! Repeat this folding and rolling process about 5 times. Now that you have kneaded your dough, start to roll it out; set the machine one notch down (from 0 to 1, in my case) and pass the dough ONCE through the rollers (no need to fold it anymore). Continue, rolling the dough once through each successive setting, until you reach 6. If you start getting holes in the pasta or the edges are not smooth maybe some bits of unwanted pasta are causing the problems. Roll of the dough off and run your hand underneath the rollers. You most probably will find little bits of dough that are causing the pasta to tear when it is rolled out. Just wipe them off with your fingers. Do the same the three remaining pieces of pasta dough, cutting them in half once they are completely rolled out (to make them easier to handle, as the strip of pasta will be quite long!)


5. Before you start to make your ravioli, allow the sheets of pasta to dry out for at least 20 minutes, turning them over every 5 minutes
. While you're waiting for your dough to dry out, stir together all ingredients for the filling, adding a little milk if it seems too thick. Season to taste with salt and pepper and set aside.
When 20 minutes are up, take a strip of dough and fold it horizontally, to make a crease, then unfold the dough. Using the crease to guide you, place a spoonfuls of filling, one for each ravioli, on the pasta (you should get about 3-4 dots of filling on each strip). Next, fold the pasta down over the filling, again using the crease to guide you. Using your fingers, squish slightly the mound of filling, and pat down the dough in between each raviolo to define the shape and remove and air bubbles.


6. Start forming your ravioli! If you have a stamp like I have (which I recommend; it makes the ravioli all uniform if you want a more polished look, but beyond that, I found it just worked better for me) Place it down over each ravioli and press down until you cut through the dough completely and the raviolo comes away cleanly. Continue with your remaining ravioli, and then set aside. Proceed in this manner (crease, filling, close, define your ravioli, cut through) with all remaining strips of dough and filling.
7. Once the ravioli are formed, put on a large pot of water to boil. While the water is boiling, melt the butter in a large skillet, and add the walnuts. Let the butter cook until brown (more on brown butter here) and then towards the end, add a few gratings of lemon zest and jiggle the pan around a little. Once the water is boiling, add your ravioli to the water. Let them cook until tender and cooked throughout, 4-5 minutes more or less. Using a strainer, remove the ravioli from the water and add them to the skillet with the butter. Toss until all ravioli are coated with butter, and then serve on a platter. Enjoy topped with a good amount of freshly grated Parmesan cheese and a few grinds of black pepper/gratings of extra lemon zest. Pat yourself on the back -- you've just made your very own ravioli!

